The OJS site
Info
Last updated: October 4, 2021
This sections deals with parts of the OJS site that don’t relate directly to issues or submissions. This includes page content and user roles. See also PKP Docs for the developer’s documentation on how to work with OJS.
Understanding the OJS homepage layout (Default Theme)
Info
Last updated: August 9, 2022 for OJS 3.3.0.11
This chapter provides an overview of all possible elements that appear on the homepage of a journal using the OJS Default Theme. This chapter only discusses the layout of the homepage as viewed on a large screen, such as a computer or large tablet.
OJS homepage layout (Default Theme)
The page elements labeled in this screenshot are described in the next section.
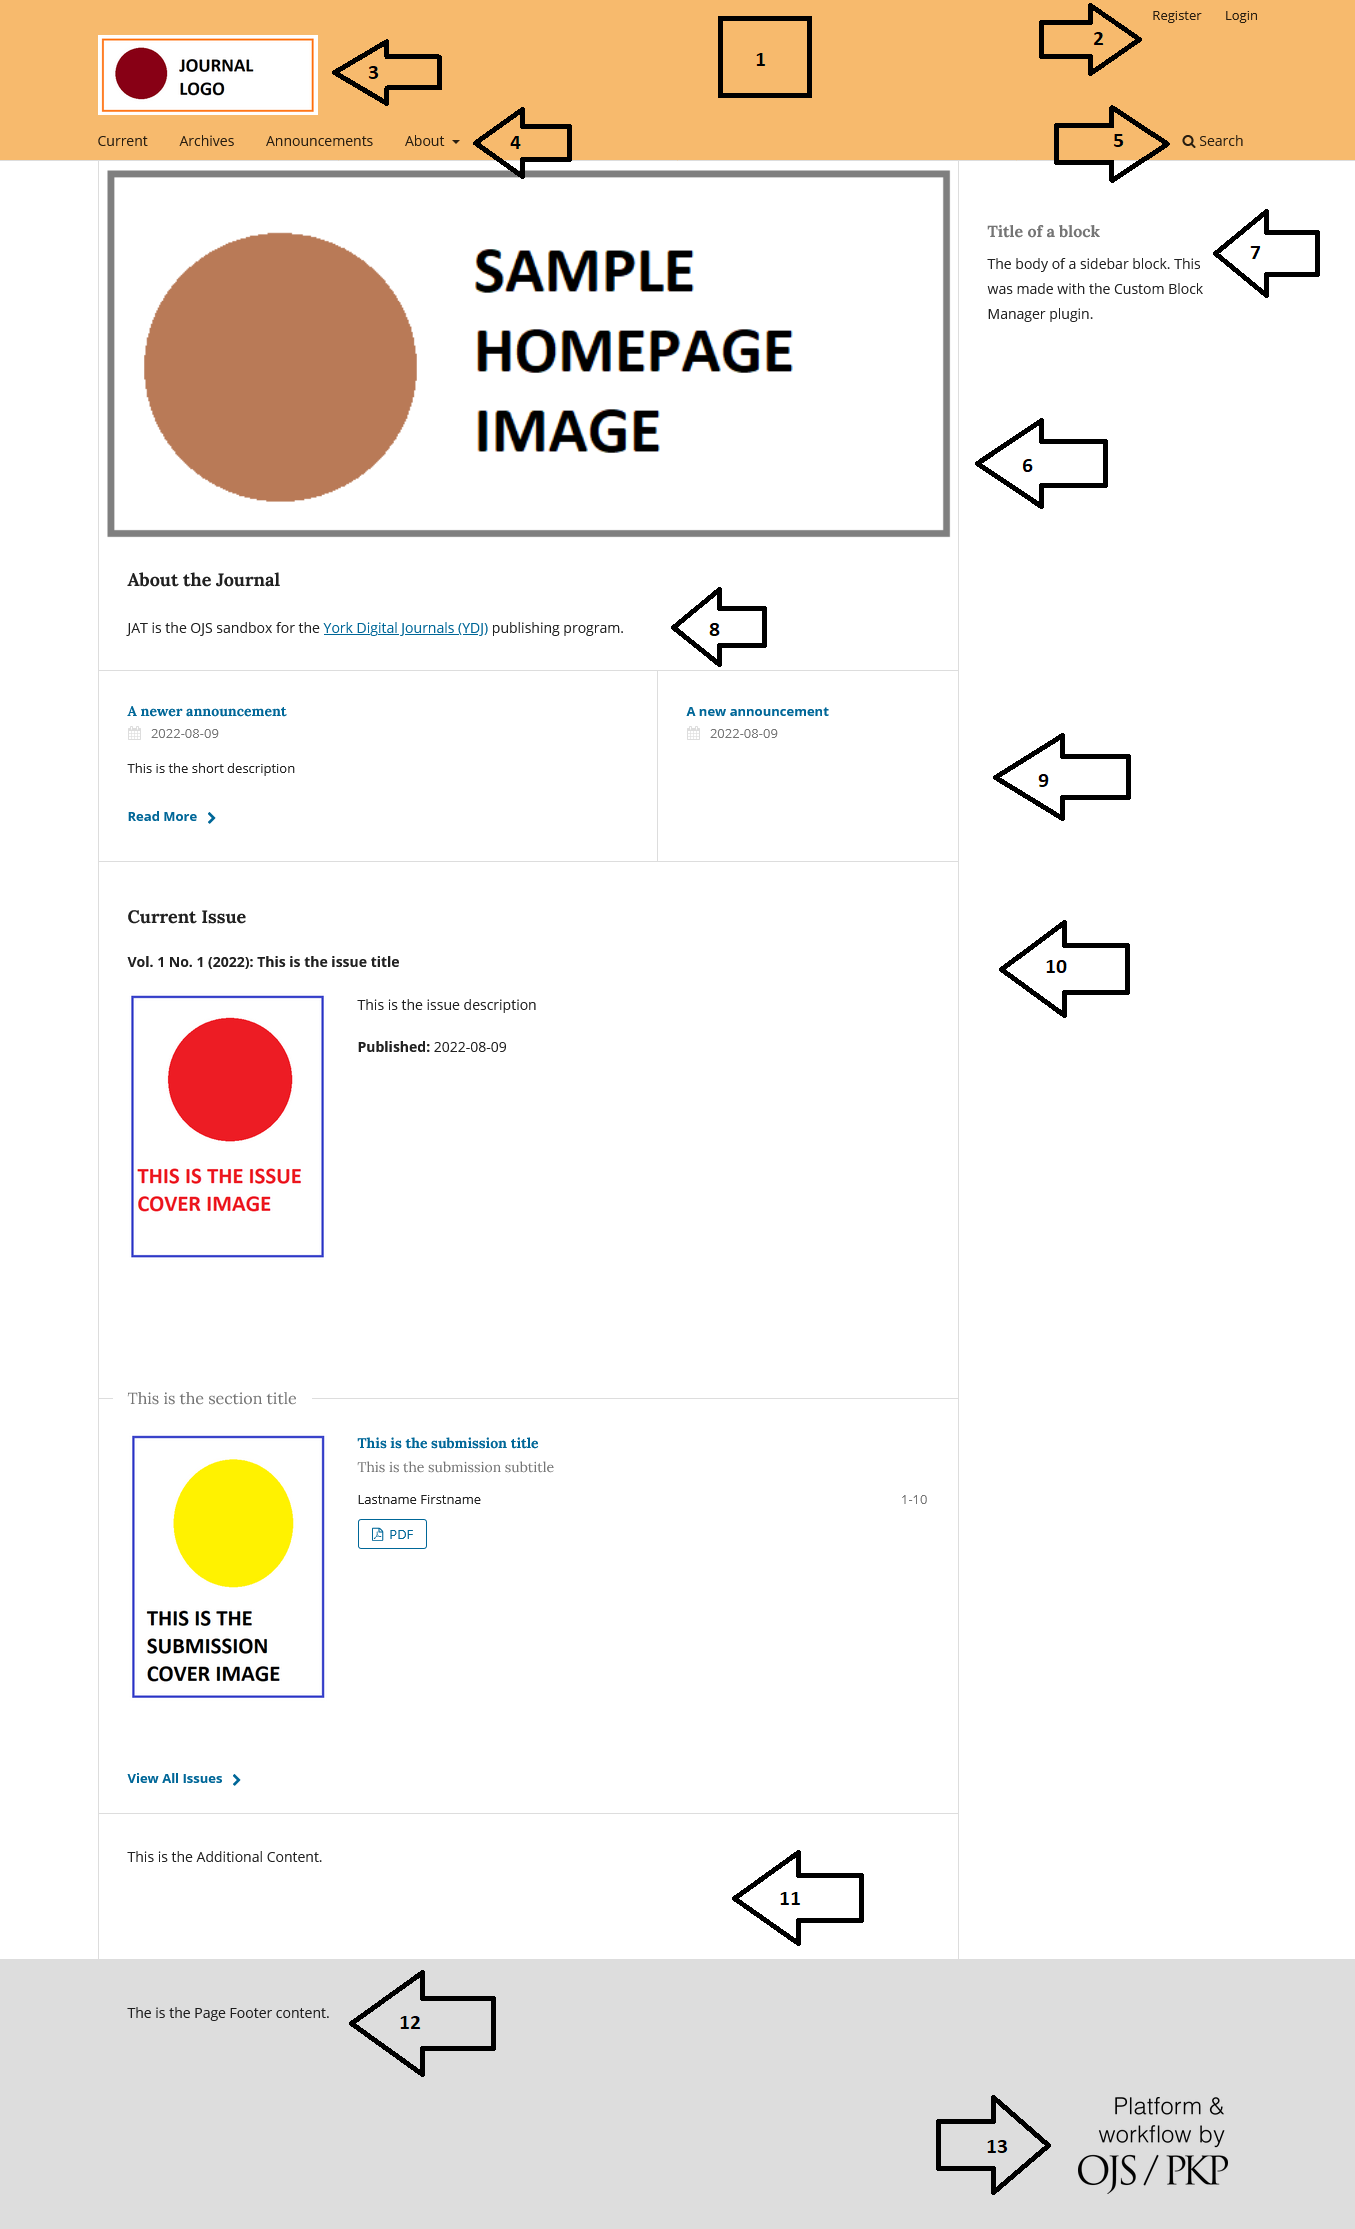
1. Header OR header background image
By default, OJS displays a coloured header at the top of the page that spans the entire window. The colour can be configured via Website Settings > Appearance > Theme, using the Colour field.
You can replace the entire header with an image if you follow two steps:
- Add a homepage image in Website Settings > Appearance > Setup in the Homepage Image field
- Click the checkbox under Header Background Image in Website Settings > Appearance > Theme.
If you use this option, you cannot have a regular homepage image (#6 below).
The screenshot on this page shows a journal homepage with the homepage image in the default location. You can also see an example of the same journal with the homepage image used as a header background.
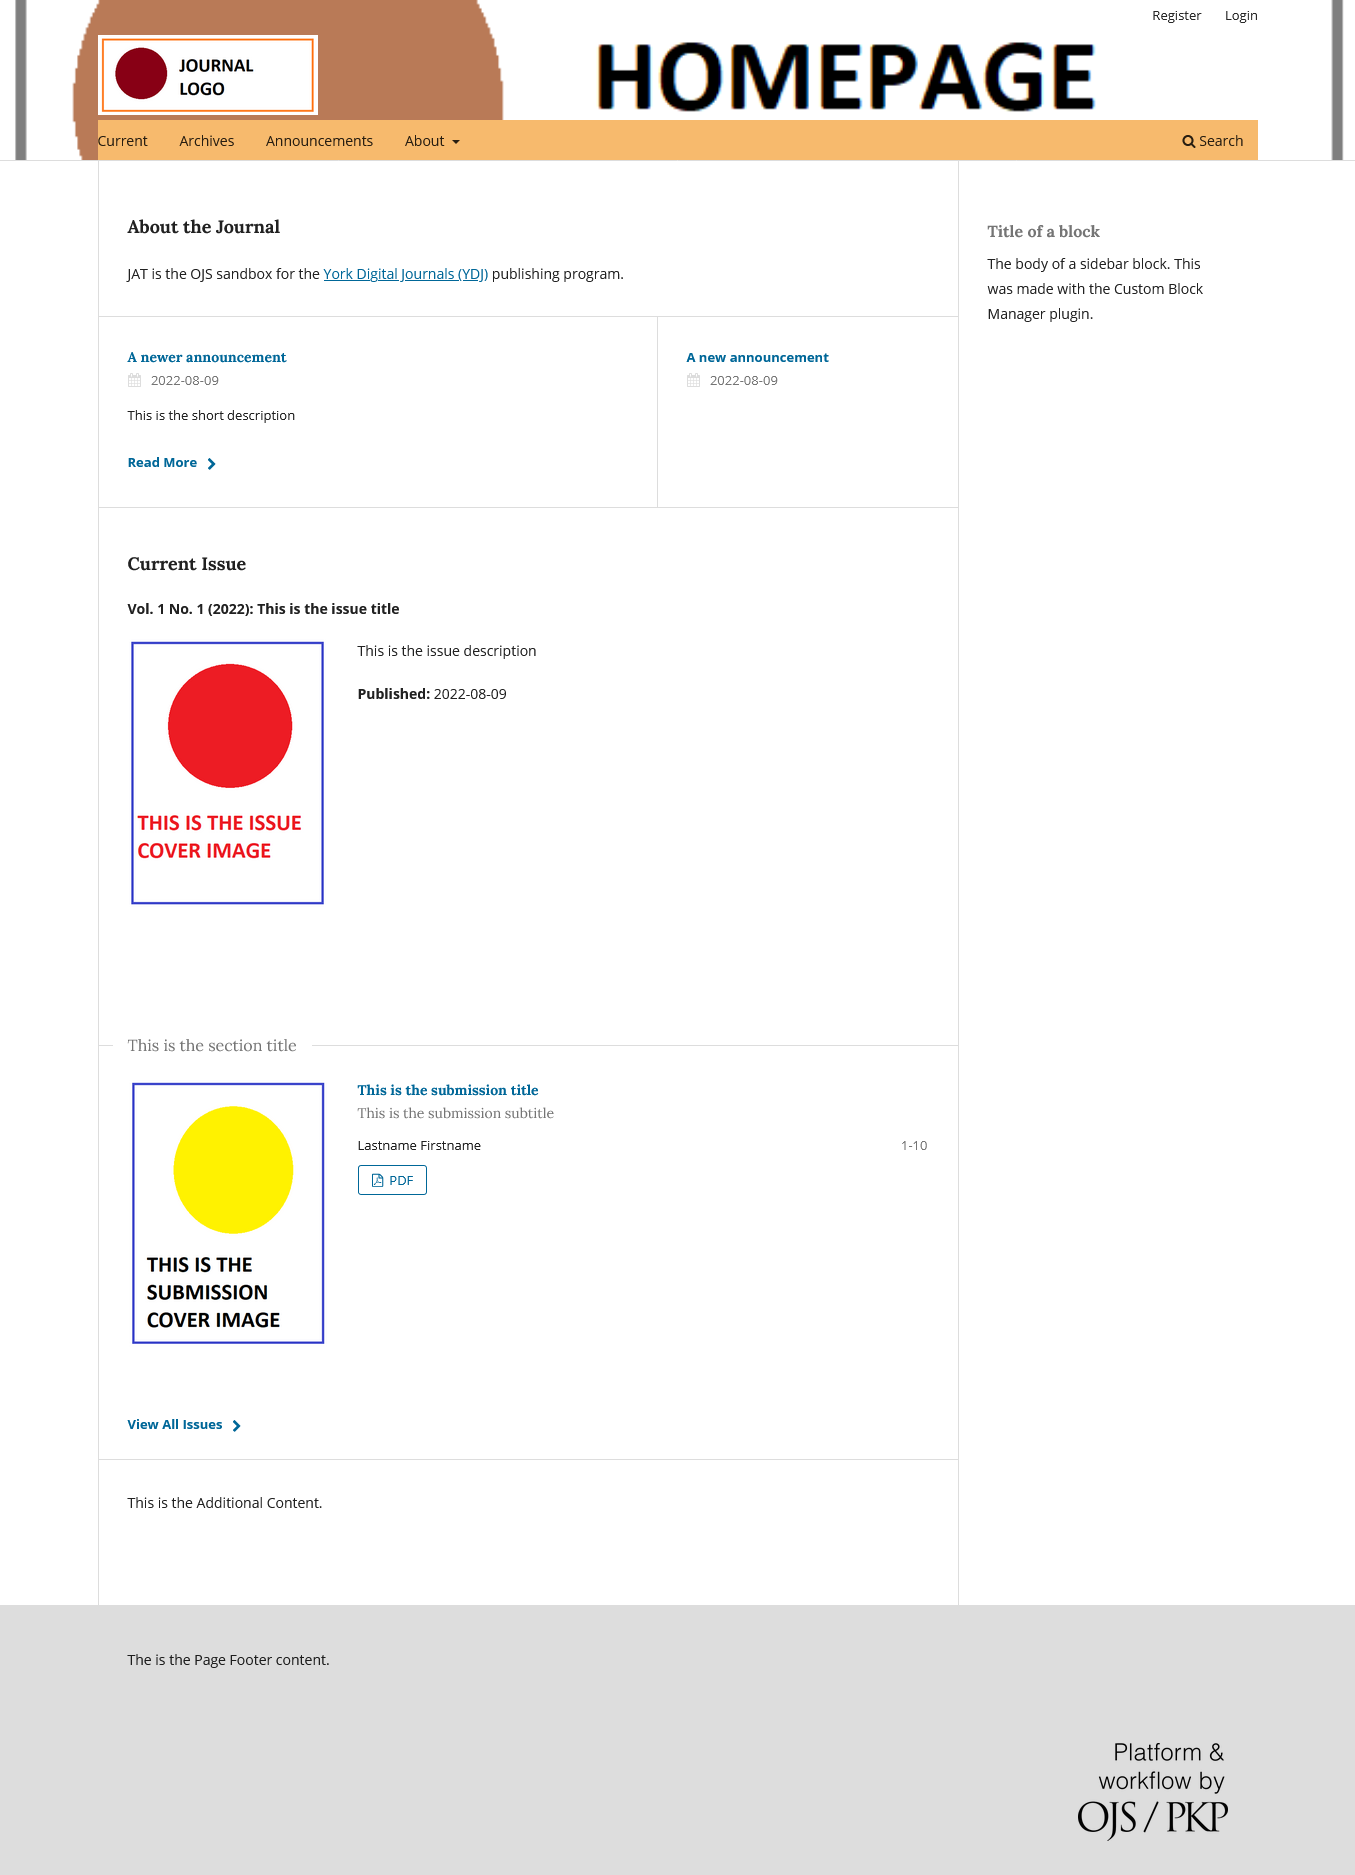
The header or header background image persist across all pages on the OJS site.
2. User navigation menu
The user navigation menu appears at the top right of the screen, against the backdrop of the header. When the visitor is logged out, this menu displays Register and Login buttons. When logged in, it displays the username as a dropdown menu with the links Dashboard, View Profile, and Logout.
The user navigation menu can be configured via Website Settings > Setup > Navigation, using the Navigation and Navigation Menu Items fields.
The user navigation menu persists across all pages on the OJS site.
3. Title OR logo
By default, OJS displays the title of the journal as an H1-level heading at the top left of the page, against the backdrop of the header. The title is configured via Journal Settings > Masthead, using the Journal title field.
You can display a logo image instead of the title of the journal. The logo is configured via Website Settings > Appearance > Setup, using the Logo field.
The screenshot on this page shows a journal homepage with a logo instead of the journal title. You can also see an example of the same journal with the journal title instead of a logo.

The title or logo persist across all pages on the OJS site.
4. Primary navigation menu
The primary navigation menu appears under the journal title or logo, against the backdrop of the header and aligned to the left margin.
The primary navigation menu can be configured via Website Settings > Setup > Navigation, using the Navigation and Navigation Menu Items fields.
The primary navigation menu persists across all pages on the OJS site.
5. Search
The search tool appears under the journal title or logo, against the backdrop of the header and aligned to the right margin. The search tool cannot be configured.
The search tool persists across all pages on the OJS site.
6. Homepage image
The homepage image is an optional element. It will only appear if an image has been uploaded to Homepage Image in Website Settings > Appearance > Setup. The homepage image will appear in the central pane of the page, below the header.
The homepage image will only be displayed on the homepage.
The homepage image can also be used to replace the coloured header (#1 above) if you upload an image and click the checkbox under Header Background Image in Website Settings > Appearance > Theme. If you use this option, you cannot have a regular homepage image.
7. Blocks
Blocks appear in the right sidebar, below the header. Multiple blocks display in sequence vertically. Blocks are configured via Website Settings > Appearance > Setup using the Sidebar field. Some plugins may add blocks to your sidebar. You can also create custom blocks for your site.
Blocks persist across all pages of the OJS site.
8. Journal Summary
The journal summary is an optional element. If activated, the journal summary will appear in the central pane of the page, below the header. If a Homepage image is present (#6), it will appear below that image.
OJS automatically adds the heading "About the Journal" when the journal summary appears.
You can activate the journal summary if you follow two steps:
- Add the summary text in Journal Settings > Masthead using the Journal Summary field
- Click the checkbox under Journal Summary in Website Settings > Appearance > Theme.
The journal summary will only be displayed on the homepage.
9. Announcements
Announcements are an optional element. If activated, announcements will appear in the central pane of the page, below the header. If a homepage image (#7) or journal summary (#8) are present, it will appear below these elements.
You can activate announcements if you click the checkbox under Announcements in Website Settings > Setup > Announcements and click Save. You can then add announcements via Announcements in the left sidebar menu.
Even if announcements are activated, the announcement elements will not appear on the homepage if:
- The number in the Display on Homepage field at Website Settings > Setup > Announcements is set to 0, or
- No announcements have been published, or
- All published announcements have expired.
The announcements element will only be displayed on the homepage. However, activating the announcements feature will create a new page called Announcements and automatically added to it the primary navigation menu.
10. Current Issue
By default, OJS displays the journal’s Current Issue on the homepage. The current issue announcements appears in the central pane of the page, below the header. If a homepage image (#6), a journal summary (#8), or announcements (#9) are present, it will appear below these elements.
The current issue element displays the full issue metadata and table of contents, including:
- Issue cover, if present
- Issue volume, number, year, and title as applicable
- Issue description, if present
- Issue publication date
- Section titles for all sections included in the issue
- Submission covers for all submissions, if present
- Submission titles for all submissions and subtitles, if present
- Submission contributors for all submissions
- Submission page numbers for all submissions, if present
- Submission galley links for all submissions
OJS automatically adds the heading "Current Issue" to the top of this element and adds a link to the Archive labeled "View All Issues" to the bottom.
By default, your Current Issue is your most recently published issue; however, you can also change your Current Issue.
The current issue element will only be displayed on the homepage.
11. Additional Content
Additional content is an optional element. It will only appear if content has been added to Additional Content in Website Settings > Appearance > Advanced. The additional content will appear in the central pane of the page, below the current issue.
Additional content will only be displayed on the homepage.
12. Page Footer
By default, OJS displays a light grey footer at the bottom of the page that spans the entire window. The colour cannot be configured.
You can add content to the page footer via Website Settings > Appearance > Setup, using the Page Footer field.
The page footer persists across all pages on the OJS site.
13. PKP logo
By default, OJS displays the logo of the software developer, PKP, in the bottom left corner of the page against the backdrop of the footer. This logo cannot be configured.
The PKP logo persists across all pages on the OJS site.
Managing your site's appearance
Info
Last updated: October 21, 2025 for OJS 3.3.0.19
This chapter covers the different elements of OJS that affect the appearance and layout of your site. This chapter complements the information presented in the PKP guide Designing Your Journal and in the Website Settings section of Learning OJS 3.3; this chapter links to the relevant sections from those guides throughout.
OJS uses responsive web design, which means that site elements will automatically rescale and rearrange to fit larger or smaller browser windows. You can see how this works on a computer by manually resizing your browser window. There is no mobile version of the OJS website: the site automatically optimizes for viewing according to the browser size. This chapter uses "large browser window" to refer to the experience a user would have on a computer with a maximized browser window or a large tablet; it uses "small browser window" to refer to the experience a user would have on a phone, a small tablet, or a computer with a small browser window.
There are five ways you can affect the overall look and feel of your OJS site:
General settings
Some elements that appear on the site are common to all journals, regardless of theme. These are controlled via Website Settings > Appearance > Setup and Website Settings > Appearance > Advanced.
The elements controled via Website Settings > Appearance > Setup are:
- Logo: an image that will appear in the header of any page on your site.. If you do not use a logo, the title of your journal will appear here as text.
- Journal thumbnail: this setting is not used for YDJ journals and is not necessary for your journal.
- Homepage Image: an image that will appear on the homepage of your site, unless the Homepage Background Image toggle (described below) is used.
- Page Footer: text or other content that will appear on the footer of any page on your site.
- Sidebar: sidebar blocks will be discussed in a separate section on this page.
The elements controled via Website Settings > Appearance > Advanced are:
- Journal style sheet: this setting will be discussed in a separate section on this page.
- Favicon: upload a favicon for your journal.
- Additional Content: text or other content that will appear at the bottom of the content page of your homepage only.
You can read more about Appearance Setup and Advanced Appearance settings in Learning OJS 3.3.
Theme and theme settings
Many elements of the OJS website are controlled by theme and the theme settings. These are configured through Website Settings > Appearance > Theme. When using the Default Theme, these settings are:
- Typography: font combinations used on the site.
- Colour: the colour of the site header.
- Journal Summary: toggle whether the Journal Summary appears on the homepage.
- Header Background Image: toggle whether the homepage image (if applicable) appears as the background of the header or in the main content pane.
YDJ prefers that participating journals use the Default Theme for two reasons:
- The Default Theme has been audited for accessibility and simplifies journals’ requirement to comply with the Accessibility for Ontarians with Disabilities Act (AODA), whereas other themes may present accessibility issues, and
- Themes other than Default are not always updated with the core OJS software and may not render or function properly when YDJ upgrades your journal to a new version of the software.
If you wish to use or try out different themes for your journal, please contact YDJ. Themes are implemented as plugins and you will not be able to implement them without assistance. YDJ cannot customize themes or fix any problems with non-Default themes that may arise.
You can read more about Theme settings in Learning OJS 3.3 and about Theme Features and Design Elements in Designing Your Journal. If you have access to development expertise, you can read about creating or modifying themes in the PKP Theming Guide.
Navigation menus
There are two navigation menus in the OJS Default Theme: the User Navigation Menu and the Primary Navigation Menu. Both menus are configured via Website Settings > Setup > Navigation. These menus may be rearranged; items may also be added or removed.
The User Navigation Menu contains a login link when site visitors are logged out or, when logged in, links related to their OJS user account. It appears at the top right of all OJS site pages when viewed in a large browser window; in a small browser window, these links are accessible via the hamburger menu at the top of the page.
The Primary Navigation Menu contains links to the public-facing site content, including About the Journal, Submissions, and Archives. It appears at the bottom of the site header on all OJS site pages when viewed in a large browser window; in a small browser window, these links are accessible via the hamburger menu at the top of the page alongsite the User Navigation Menu links.
You can edit each menu by rearranging, adding, and removing menu items. Be careful when removing menu items, lest you make important parts of the website inaccessible to readers. Adding a new Navigation Menu Item creates a new page on the OJS site that can be added to a menu.
You can read more about Navigation settings in Learning OJS 3.3.
Warning
Creating a page with the same URL as an existing page in OJS may cause a site-breaking URL conflict. Before creating a new page, test your intended URL by inputting it into your browser to see if a page with that URL already exists on your site.
Sidebar blocks
Blocks are flexible content containers that can appear to the right of the main content pane on any OJS page (on a large browser window) or below it (on a small browser windows). Blocks are managed via the Sidebar settings at Website Settings > Appearance > Setup, where you can reorder, activate, or deactivate blocks.
Several blocks are activated by default in OJS. Several plugins will also create blocks that can be managed via the Sidebar settings. One of these plugins is the Custom Block Manager, which allows you create custom block content. Learn more about Adding custom blocks to the right sidebar elsewhere in this guide.
Stylesheets
You can customize the deisgn of your OJS site by adding a .css file to Journal style sheet, which is accessed via Website Settings > Appearance > Advanced. You can read more about stylesheets in the Create a Stylesheet section of Designing Your Journal.
YDJ cannot customize stylesheets or fix any problems with custom stylesheets that may arise. If your custom stylesheet causes accessibility problems, we will require you to edit your stylesheet; if the accessibility problems are serious enough, we may have to remove the stylesheet unilaterally in order to comply with AODA requirements.
Adding custom blocks to the right sidebar
Info
Last updated: November 22, 2021 for OJS 3.3.0.8
You can create custom blocks to appear in the right sidebar by following these steps:
- In the back end, go to Website > Plugins.
- On the Installed Plugins screen, you should see plugin called Custom Block Manager in the Generic Plugins section.
- If you do not see the Custom Block Manager in that list, contact YDJ to have it installed before proceeding.
- Activate the Custom Block Manager by clicking the checkbox beside the plugin description.
- Once activated, click the blue triangle next to the plugin name to see the plugin options.
- Click Manage Custom Blocks.
- In the Custom Block Manager window, click Add Block.
- Add the Block Name, Content, and check Show Name if desire.
- Click Save.
- Go to Website > Appearance > Setup.
- Activate your custom block by checking the box next to the block name in the Sidebar section.
- Drag the blocks into your preferred order.
- Click Save.
Managing plugins
Info
Last updated: October 7, 2021 for OJS 3.3.0.8
Plugins provide extra functions in OJS. Some plugins are developed by the PKP community and are available through the OJS administrative interface; others are developed by third parties and must be uploaded manually.
Managing plugins
You can access your journal’s plugins through the Plugins tab on the Website Settings page. There, you will find two facets: Installed Plugins and Plugin Gallery.
Installed Plugins lists the plugins that are installed on your system but not necessarily activated. To activate them, you must click the checkbox to the left of the plugin’s name.
Most of the built-in plugins for OJS are updated when the core OJS software package is updated.
Installing and updating plugins
The Plugin Gallery lists optional plugins that you can install on your system and will also display whether updates are available. Only the OJS administrator can install and update plugins – you will not be able to do this for your own journal, even if you have the Journal Manager user role. If you wish to install or upgrade a plugin, please contact YDJ.
YDJ has not yet been able to automate the plugin update process for our journals, although we are currently working on this. Therefore, you may sometimes discover that certain plugins (such as QuickSubmit are not available due to an update being required. If this happens, please contact YDJ.
Third-party plugins
If you discover third-party plugins you wish to use, contact YDJ to discuss installing them. If YDJ has no immediately concerns about security or computing resources, we should be able to install them for you.
YDJ cannot support the use or maintenance of third-party plugins. In other words: if the plugin doesn’t work with the current version of OJS, or if the plugin doesn’t work as expected, or if you can’t figure out to use the plugin, we will be unable to support you. Additionally, if YDJ discovers that there is a major security concern with the plugin, we may have to unilaterally uninstall it.
Changing user roles
Info
Last updated: April 19, 2022 for OJS 3.3.0.10
To change the roles assigned to any user account, including your own:
- In the left navigation menu, click Users & Roles (under Settings)
- Search or browse to locate the account you wish to edit
- Click the blue triangle to the left of the user name and then click Edit User
- In the Edit User window, scroll down to User Roles and check/uncheck the roles as required
- Click OK to save your changes.
You must have the Journal Manager or Journal Editor role in order change user roles. However, you will not be able to change the YDJ admin account or certain special accounts created by and for YDJ staff.
Reviewing user roles
Info
Last updated: April 19, 2022 for OJS 3.3.0.10
Certain user roles in OJS grant permissions to make major changes to the OJS site or to publish and unpublish content. Journal Manager, Journal Editor, and Production Editor are the roles with the most permissions to make changes to the site and content. Section Editor and Guest Editor may also affect site content to a less degree.
For security’s sake, it is important to make sure that users do not retain these roles if they no longer occupy editorial positions for your journal. You should ensure that only current editorial staff for your journal have these roles in OJS. YDJ recommends that you periodically review which users have these editorial roles, and update those users’ accounts as required.
You must have the Journal Manager or Journal Editor role to view user accounts.
To review all user accounts that have a particular role:
- In the left-hand navigation menu, click Users & Roles under Settings
- Click the Search button
- Use the drop-down menu to select the role you wish to review (the default is All Roles)
- Leave the text box blank and click Search.
You will now see a list of all user accounts that have this this role assigned. You can now update user roles as required.
Note: YDJ maintains an admin account for all journals, which is required for hosting. Periodically, YDJ will create additional accounts for troubleshooting or for special projects – we will generally inform you if this is required and will usually use descriptive usernames to identify these accounts.. We also have a policy of periodically reviewing and, if necessary, removing YDJ staff accounts. If you see any accounts that should not have editorial privileges for your journal, you should update them accordingly.
Adding sections
Info
Last updated: August 18, 2022 for OJS 3.3.0.11
To add a new section to your journal:
- Go to Journal Settings > Sections
- Click Create Section
- Add the Section Title and Abbreviation
- You may add a Section Policy if you wish.
- Note: this content will appear on the Submissions page on the front end, alongside the Submission Guidelines
- Check the Section Options, as appropriate
- Note: important options with downstream implications include Will not be peer-reviewed, Do not require abstracts, and Items can only be submitted by Editors and Section Editors.
- Click Save.
The new section will now be available during the appropriate submission workflows.
Understanding and using Categories
Info
Last updated: May 2, 2025 for OJS 3.3 and 3.4
The Category feature is best used as a browsing tool for readers that is distinct from Issues and Sections. It should be used in conjunction with the Browse Block or with navigation menu items.
When you create a Category, you do two things:
- You create a page for that Category, which includes a list of all articles assigned to it, as well as an optional description and cover image. (Example: Category browse page)
- You add a field to the submission’s metadata page, which links to the Category page. (Example: submission metadata page)
You can also nest Categories one level using Parent Category. Both the Parent Category and the nested Category will receive their own pages. The Parent Category page will link both to the submissions assigned to it and to the pages for the nested Categories.
Unlike sections, Categories do not appear in an issue’s table of contents and cannot be used to direct submissions to a particular editor. However, Categories can be used to make related content from across multiple issues in the same place. If you wish to make your journal content browsable by section, please request that the Digital Publishing Librarian install the Browse By Section Plugin.
Creating Categories
Create and edit Categories at Journal Settings > Categories.
Assigning submissions to Categories
If your journal has created any Categories, they will appear in the submission process for authors as well as in the QuickSubmit form. You can also edit the Category assignment in a submission’s Publication > Issue tab.
Making Categories discoverable
Categories should be used in conjunction with the Browse Block, which can be activated at Website Settings > Appearance > Setup > Sidebar. This sidebar block will automatically update as Categories are added, removed, or nested.
You may also also wish to manually create Navigation Menu Items for your Categories. However, these will not automatically update as Categories are added, removed, or nested.
Enabling and disabling notifications
Info
Last updated: November 9, 2022 for OJS 3.3.0.13
OJS makes several automatic notifications available to users. These notifications may be email and will also appear in the notifications section of the journal dashboard for logged-in users. Some user accounts are automatically enrolled for specific notifications based on their role – for example, journal editors are automatically enrolled for email notifications about editorial statistics.
To turn notifications on or off:
- Log into your OJS account for the journal
- In the back end, click the profile avatar icon in the top, far-right corner of the window
- Click Edit Profile
- On the Profile page, open the Notifications tab
- Enable or disable notifications and email alert for specific events and announcements as required
- Click Save.
At present, it does not appear to be possible for journal managers or editors to enable or disable notifications on behalf of users.
Helping users who cannot access their accounts
Info
Last updated: August 26, 2026 for OJS 3.5.
Users often ask for help accessing their account. This is especially true for users who log in only rarely (such as authors and reviewers) who either forget their passwords or forget which email account they used. Note: it not possible for Journal Editors, Journal Managers, or YDJ to access or reset account passwords.
If you as Journal Editor or Journal Manager receive such a request, you can resolve it yourself in most cases. Do not contact YDJ right away, and follow these steps instead:
- Direct the user to use the Forgot your password? feature on the login page. This requires that they know which email address they used to create their account.
- If they cannot recall which email address they used to create their account, you (the editor) should go into Users & Roles > Users to determine which address they used.
You should only contact YDJ if these steps do not give the user access to their account.