Digital Object Identifiers (DOI)
Info
Last updated: November 19, 2021
Warning
This section describes DOI management and YDJ configuration in OJS 3.3. DOI management changed significantly as 3.4. the DOI creation mechanism was overhauled in OJS 3.4 and the workflow described on this page does not apply. Please see the section on DOIs from Learning OJS 3.5 for Journal Managers.
Digital Object Identifiers (DOIs) may be available for your journal. Please contact YDJ to find out if your journal is eligible.
YDJ registers DOIs through York University Libraries’ Crossref membership. Our membership specifies that we are obligated to publish reference lists for submissions which receive DOIs. This section includes a chapter on how to upload and publish reference lists.
Determining the structure of your DOIs
This chapter explains the syntax of a DOI, how to determine the submission ID (a part of the DOI syntax), and how transform the DOI into a URL.
DOI syntax
There are two parts to a DOI: a prefix and a suffix, separated by a slash.
The prefix for all YDJ DOIs is "10.25071."
The suffix for all YDJ DOIs is:
- the ISSN of the journal
- a period
- the OJS submission ID.
For example, 10.25071/1920-7336.40655 is the DOI of a YDJ article. "1920-7336" is the ISSN of the journal and "40655" is the submission ID assigned by OJS.
OJS assigns every submission a unique, numeric ID as soon as it is created. By using the ISSN in combination with the submission ID, we ensure that there is no duplication of DOIs across journals or within the same journal.
How to determine the submission ID
You can determine the submission ID by viewing the submission in the back end of OJS. The submission ID appears in two places (see Figure 1):
- the portion of the URL following "/index/"
- the running header of the submission, to the left of the author’s name
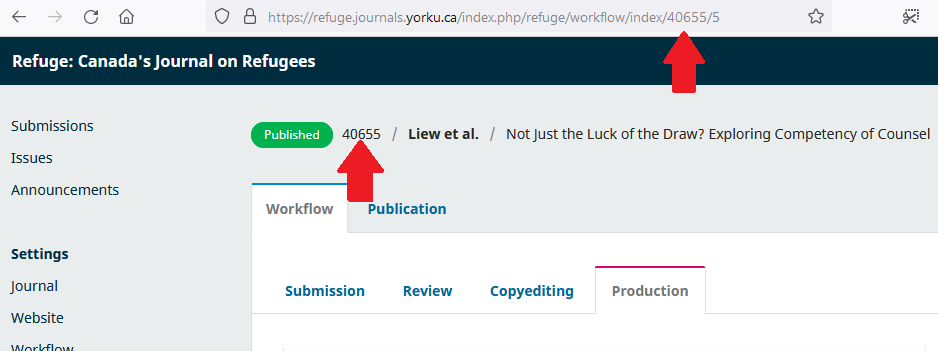
Figure 1: The location of the submission ID is indicated by the two red arrows. In this case, the submission ID is 40655.
The submission ID also appears in the URL of the submission once published.
Turning a DOI into a URL
A DOI transforms into a URL by adding "http://doi.org/" at the start of the DOI. This sting is technically not part of the DOI; however, DOIs must be transformed into URLs to be useful to most readers.
For example, the URL for the DOI 10.25071/1920-7336.40655 is http://doi.org/10.25071/1920-7336.40655.
Uploading and publishing reference lists
Info
Last updated: November 19, 2021 for OJS 3.3.0.8
Info
All journals receiving DOIs are obligated to publish reference lists in the metadata of articles with citations.
YDJ registers DOIs through York University Libraries’ Crossref membership. Our membership specifies that we are obligated to publish reference lists for submissions which receive DOIs. This chapter explains how to publish reference lists with your submissions in order to comply with this requirement.
If your journal provides DOIs but does not publish reference lists for new submissions, YDJ may need to cease provision of DOIs for your journal.
Reference list setup
To publish reference lists, you must first make a policy decision and then make a corresponding change to the configuration of OJS.
The policy decision is a choice between three alternatives:
- Are editors solely responsible for uploading reference lists?
- Are authors requested to upload reference lists with their initial submission? In this case, editors are responsible for uploading reference lists if the author does not.
- Are authors required to upload reference lists with their initial submission?
If you chose the options 2 or 3, you may wish to update your Submission Checklist and Author Guidelines.
Once you have made your policy decision, you must implement this in OJS:
- Go to Workflow Settings > Submission > Metadata
- Under References, check the box for Enable references metadata
- Select the radio button corresponding to your policy choice
- Click Save.
If you chose policy options 2 or 3, the references metadata field will now appear in the regular submission and QuickSubmit interfaces. In all cases, the reference metadata field will now appear in the Metadata facet of the submissions Production tab.
Reference list format
The reference lists are style-agnostic. This means the reference lists can be uploaded in any citation agnostic.
Each reference in the list should start on a new line.
Tip
We recommend that you or your authors remove all DOIs from the reference lists prior to publication. The Crossref Reference Linking Plugin, which the Digital Publishing Librarian will configure when setting you up for DOIs, will automatically search for and include DOI links for any reference in the list with a DOI. If there are already DOIs in the reference list, those references may display 2 DOI links.
Publishing the reference lists
The reference lists are published with the submission metadata as soon as the submission is published. The editors only need to get involved if the authors do not provide the reference lists themselves.
Creating and registering DOIs
Info
Last updated: June 4, 2025 for OJS 3.3.0.19
There are two steps to adding DOIs to your submissions:
- Creating DOIs (also called "minting"): creating and assigning a unique DOI for the submission, which includes the DOI prefix for YUL and the unique string to identify the submission.
- Registering DOIs: registering DOI with Crossref (the registration agency with whom YUL is partnered) is required to make DOI links behave like DOIs and redirect to the OJS page for the submission.
In most cases, you will create DOIs manually and DOIs will register automatically; however, in some cases you will need to register DOIs manually.
How to create and register DOIs according to publication model
| Publication model | Creating DOIs | Registering DOIs |
|---|---|---|
| Standard publication: new submissions are published for the first time via a new issue | Manual | Automatic |
| Online First/Forthcoming publication or rolling publication: new submissions are published for the first time after the issue is published | Manual | Manual |
In rare cases, you may need to create DOIs in bulk. In OJS 3.3, this can only be done after publication.
Creating DOIs
In most cases you create DOIs for each submission manually when preparing for publication. Using this method, you should create the DOI to the submission before publishing it; otherwise you will need to edit each submission after publishing unless you use the bulk method described below.
To manually create a DOI for a submission:
- In the back end of OJS, go to the submission’s Publication tab
- Click the Identifiers tab
- On the Identifiers tab, you should see the heading DOI with a blank text input field below it and a button labeled Assign. Click Assign.
- When you click Assign, a DOI will appear in the input field. Click Save to finish.
Once the submission is published, the DOI must be registered.
Optional: creating DOIs in bulk
If you create DOIs to multiple submissions after publication, you can use the bulk method. In OJS 3.3, this can only be done after publishing the submissions.
To create DOIs in bulk:
- In the back end of OJS, click Tools near the bottom of the left sidebar
- In the list of tools, click Crossref XML Export Plugin
- In the Settings tab of the Crossref XML Export Plugin, click DOI Plugin Settings
- In the DOI Plugin Settings window, click Assign DOIs. The page will appear to be loading for several moments once you do this
- Click Save. You will now return to the Crossref XML Export Plugin page.
- Follow the instructions for Registering DOIs manually, below.
After you create DOIs in bulk, you must register them manually (described below).
Registering DOIs
Once you have created the DOIs, you must register them to ensure that they function as DOIs. This allows the DOI URL to redirect to the publication page, and allows Crossref to track citations.
Automatic DOI registration
If your journal uses the standard, basic form of publication (submissions are published for the first time when a new issue is published), the DOIs should automatically be registered once a new issue is published.
However, sometimes the DOIs don’t register automatically for unknown reasons; if this happens, you will need to register the DOIs manually. Note: DOI registration takes some time to complete; please wait up to an hour before checking to see if the DOIs have registered.
Manual DOI registration
If your journal uses an Online First/Forthcoming or a rolling publication model, or if the DOIs do not register manually, you will need to create and assign and register the DOIs manually.
To register DOIs manually:
-
- In the back end of OJS, click Tools near the bottom of the left sidebar
- In the list of tools, click Crossref XML Export Plugin
- On the plugin page, click the Articles tab. If your journal has a large number of articles, it may take some time to load
- In the Articles tab, click Search. This will show several new drop-down menus above the list of articles
- Select that drop-down menu that says Any Status and change it to Not Deposited
- Click Search. You should now see a list only of published submissions that have DOIs assigned but are not registered
- Check the boxes for each submission you wish to register in the Select column
- Click Deposit
If you received any error messages that you cannot understand and address, please contact the Digital Publishing Librarian for assistance.
DOIs and QuickSubmit
Info
Last updated: July 28, 2025 for OJS 3.3.0.19
After you add submissions to a future issue through QuickSubmit, you should manually assign the DOIs for each article before publishing the issue.
To find the submissions and assign DOIs:
- In the back end, go to Issues > Future Issues
- Click the title of the issue to view the assigned submissions
- In the table of contents, click the blue triangle to the left of the submission title to see the additional options
- Click Submission to see the submission workflow and publication metadata
- Click Publication to open the publication tab
- Click Identifiers
- Under the DOI heading, click Assign next to the blank text box. The predetermined DOI will appear in the text box
- Click Save
- Repeat steps 3-8 for all submissions assigned to the issue.
The DOIs will register automatically upon publication of the issue.